Feeds:
Posts
Comments

Archive for September, 2009

DSC02173If you love olives, you will love this hummus recipe, plain and simple. This is my newest spicy/salty creation, taste tested by coworkers to rave reviews!

I’ve been making hummus for 15 years and I never make it the same way twice. However, this recipe was inspired by my hubby’s cousin, Margaret Buckton, who uses kalmata olives in her hummus to utmost deliciousness. So, I followed her basic recipe and added some fresh cilantro and parsley for good measure. Tahini is an absolute must in any hummus recipe and can be found in local natural or organic food stores everywhere. I always buy mine organic and unsalted, but any old tahini will do!

Tip: My kids love hummus (eat it with a spoon) but it’s an acquired taste. Skip the pepper in this recipe if making it for the kiddos.

Ingredients:

1 can garbanzo beans
1/4 cup tahini
1/4 cup kalmata olives (seedless)
1 clove garlic
1 tsp. cumin
3 tbsp. fresh lemon juice
1 red chile pepper, chopped
1 tbsp. fresh cilantro
1 tbsp. fresh parsley
Sea or kosher salt to taste
1 glug olive oil

DSC02171Directions:

1. Drain beans and save the “juice.”

2. Measure above ingredients into food processor, with the exception of the garbanzo bean juice, salt and olive oil.

3. Process and add garbanzo bean juice a little at a time, until you reach a smooth consistency.

4. Add olive oil.

5. Taste and then add sea salt to taste, 1/4 tsp. at a time.

6. Chill and serve with veggies, pita chips, tortilla chips and possibly even a little plain goat cheese or feta!

Read Full Post »

Peanut Butter Fudge BrownieWhen I got home from a conference last night, my daughter, Sophia, had something on her mind. Fudge. She was dying for me to make our family fudge recipe. I didn’t have a candy thermometer, so we compromised with this Peanut Butter Fudge Brownie recipe and she wasn’t disappointed!
Sophia and her brother, Gus, helped me make the brownies this afternoon. Now, let me tell you, baking a new recipe with kids is tough. The first ingredient you have to have is patience. And, with my kids, I need to have eyes in the back of my head. As you can see from the video, they love to taste test along the way!

I have a few tricks up my sleeve when it comes to kids helping out. First, the hand mixers. As I’ve said in an earlier post, this is a must-have utensil because it’s interactive and keeps the kids engaged, though it takes some practice to get used to it. Gus is four and he’s got it down pretty well.

My second trick for cooking and baking is to get a plastic “kid knife.” Kids can use these quite safely to cut anything from butter to veggies. Finally, we use a coffee cup for cracking eggs. This way, the shells are easy to fish out (though in this recipe I used crunchy peanut butter, just in case).

This recipe was sourced from the Southern Food section on About.com and is by Diana Rattray.

Ingredients:

Chocolate Batter:
2 cups sugar
1 cup butter, room temperature
1 teaspoon vanilla
4 eggs
1 1/2 cups all-purpose flour
3/4 cup cocoa, unsweetened
1 tsp. baking powder
1/2 tsp. salt

Peanut Butter Batter:
3/4 cup natural peanut butter
1/3 cup butter, room temperature
1/3 cup sugar
1 tsp. vanilla
2 tablespoons all-purpose flour
2 eggs
1 teaspoon vanilla

Directions:

1. Grease and flour a 13×9-inch baking pan.

2. In mixing bowl, cream 2 cups sugar and 1 cup butter until light and fluffy. Add  vanilla and 4 eggs, 1 at a time, beating well after each addition.

3. Gradually add 1 1/2 cups flour, cocoa, baking powder, and 1/2 teaspoon salt. to the creamed mixture. Mix well. Stir in peanut butter chips.

4. In a small bowl, cream peanut butter and 1/3 cup butter.

5. Add 1/3 cup sugar and 2 tablespoons flour; blend well.

6. Add 2 eggs and 1 teaspoon vanilla; beat until smooth.

7. Spread half of the chocolate mixture in prepared baking pan.

8. Spread the peanut butter batter over chocolate batter.

9. Spread remaining chocolate batter over top.

10. Gently cut through layers with a knife to create a marbled look.

11. Bake brownies at 350° for 40 to 50 minutes, or until top springs back with lightly touched in center with finger.

12. Brownies should begin to pull away from sides of pan.

13. Cool completely in pan.

Read Full Post »

Gameday Crockpot Chili

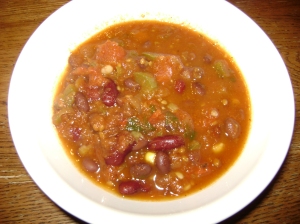
DSC02098I love football season for two reasons. 1. It makes my husband ridiculously happy. 2. This distracted happiness gives me plenty of time to make homemade chili. Nothing says a perfect end to a perfect fall day to me than a huge crock pot full of homemade chili. It’s our family’s favorite comfort food — and this version is ridiculously healthy and flavorful.

I used to make my chili with habenaros and jalapenos, but I’ve learned how to take it down several notches for the kiddies by using a roasted poblano pepper. This gives the chili a smoky, peppery flavor without all of the “heat” from the hot chiles. If you have a gas stove, it’s easy to roast your own pepper. Check out this article from Summer Tomato to learn how. Serve it up at halt-time with fresh salsa, sour cream, pepper jack cheese, jalapenos and lots of blue and red tortilla chips.

Ingredients:

2 tsp. olive oil
1 large onion, diced
1 poblano pepper, roasted, seeded and then chopped
2 cloves garlic, minced or pressed
2 ears of fresh sweet corn, or 1 14.5-oz. can of corn
1 small green pepper, diced
1 small red pepper, diced
1 can red kidney beans
2 cans black beans
2 tbsp. chili powder
1 tbsp. cumin

If using canned tomatoes:
1 14.5-oz. can diced  tomatoes
1 28-oz. can tomato sauce

If using fresh tomatoes, use:
2 cups fresh tomatoes, chopped
2 quarts fresh tomatoes, peeled, cored and pureed
4 tbsp. fresh cilantro (garnish)

Roasted Poblano PepperDirections:

1. Roast pepper. (Follow these directions from Summer Tomato.)

2. Saute onions and peppers in oil on medium-high heat until clear, about five minutes.

3. Add garlic and saute for two minutes more or until fragrant.

If using canned tomatoes:

4. Combine sauteed ingredients and all remaining ingredients in crock pot. Cook on low heat for four hours or until desired thickness (I like my chili T-H-I-C-K).

If using fresh tomatoes:

4. Combine sauteed ingredients and all remaining ingredients in crock pot. Cook on high heat for four hours or until desired thickness (leave yourself an hour of cooking on low heat for a thicker consistency).

Read Full Post »

DSC02112I made this dish for my book club last week. Our book was The Omnivore’s Dilemma by Michael Pollan. This book is about the way Americans eat and the food chains that sustain us, from industrial down to organic. This dish is in the hyper-local organic category (my terminology) because it features veggies from my neighbor, Kristin’s,  garden and the farmer’s market. The cheeses come from our local dairy outlet, Hansen’s Dairy.
During our discussion, we talked about the difficulties of cooking and eating the hyper-local, organic way. It’s true — this is time consuming and not what most of us are used to. However, the benefits to the environment, our health and our culture outweigh the monetary costs, especially in the long-term. So head out to your garden or farmer’s market and enjoy a dilemma-free meal with your loved ones while these great veggies are still in season!

Ingredients:

2 large zucchini (approx. 8” each, or 3 medium), thinly sliced
1 small onion, sliced into thin rings
3 fresh tomatoes, thinly sliced
3 cloves garlic, minced or pressed
2 to 3 tbsp. olive oil
1/2 cup fresh mozzarella
1/4 cup feta cheese
Freshly ground black pepper
10 fresh basil leaves, cut into a chiffonade

Directions:

1. Preheat the oven to 350ºF (180 ºC). Spray a deep 8 x 8 baking dish (2 quarts) with cooking spray or lightly brush with oil.

2. In a medium bowl, combine cheeses.

3. Layer the veggies and cheese like this: zucchini rings first, then garlic, then tomatoes, then onions, then basil, then cheese. Repeat until you’ve filled your dish and the last layer is cheese. Top with dried basil or rosemary.

4. Cover and bake until zucchini is tender; about 45 minutes.

5. Uncover and bake until cheese is melted and golden, about 10 more minutes.

NOTE: This recipe will be “juicy” from the veggies, there’s no getting around it. The book club members didn’t seem to mind, and I saved the “juice” to use in a soup later.

Read Full Post »

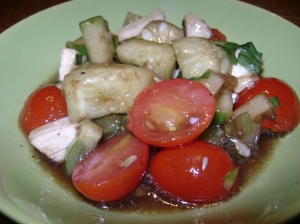
DSC02108With fresh basil, tomato and mozzarella, this cucumber salad is a twist on those fabulous sandwiches served at old-school Italian delis.  I served this up with homemade pizza, but it will go great with any late summer/early fall dinner. It also stays fresh for several days, so it’s great to pack leftovers into kids’ and parents’ lunches.
Ingredients:

1/4 cup extra virgin olive oil
8 tablespoons balsamic vinegar
1 heaping tbsp. organic sugar
1/4 cup water
1/2 teaspoon sea or kosher salt
1 clove garlic, minced
10 fresh basil leaves
3 small fresh cucumbers, chopped (pickling or thin slicing)
10 cherry tomatoes
3 tomatillos
1/2 cup fresh mozzarella, cubed
3 garlic or regular chives, minced
Freshly ground pepper and salt to taste

Directions:

1. Slice cukes in half, turn them onto their bellies and cut them into thirds. Cross-cut the thirds to make cubes.

2. Slice tomatoes in half.

3. Mince garlic and add it to a large liquid measuring cup.

4. Pour 1/4 cup extra-virgin olive oil into the measuring cup.

5. Add balsamic vinegar and sugar.

6. Whisk the above ingredients together until well combined. Add water and whisk again.

7. Sprinkle salt, pepper and garlic chives over the cukes and tomatoes in a large bowl. Add mozzarella, then pour vinegar/oil mixture over the veggies/cheese.

8. Stir all ingredients until well combined. Do a taste test and add salt and/or pepper to taste.

Read Full Post »

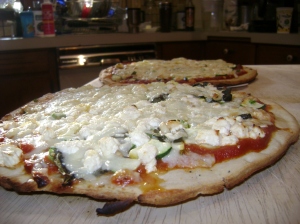
DSC02106This pizza recipe is soooo easy and guaranteed to be kid-friendly. Now, not every ingredient in this recipe is from scratch, but sometimes, busy parents need to compromise in order to fit a good meal into a crazy schedule. It takes about 15 minutes of prep time (kids can help) and 12 to bake.

I like to buy organic crust and sauce, but you can use whatever you have available. Since summer squash is still in season, I used it in this recipe, but you could also use broccoli, peppers, onions, mushrooms, whatever veggies you have available. Just make sure you use fresh mozzarella and real feta cheese!

Ingredients:

1 prepared pizza crust (such as Boboli)
1 jar spaghetti or pizza sauce (such as Muir Glen)
1 cup shredded fresh mozzarella
1/2 cup crumbled feta
10 basil leaves
1 small summer squash, thinly sliced
1 small zucchini, thinly sliced
2 tbsp. pine nuts

DSC02110Directions:

1. Follow directions on prepared pizza crust for preheating oven and preparing crust.

2. Spread about 1 cup prepared pizza sauce on the crust.

3. Place squash and zucchini over sauce.

4. Sprinkle pine nuts evenly over squash/zuke.

5. Place basil leaves curved side down over pine nuts.

6. Spread cheeses evenly over everything.

7. Bake for about 12 minutes (at 425) or until golden brown and cheese is completely melted.

8. Serve with a small lettuce salad and enjoy! (Gus is enjoying his by picking off the veggies, but oh well.)

DSC02111

Read Full Post »

DSC01849If you’ve never heard of the Green Zebra tomato, you’re in for a treat. That is, if one of your local farmer’s market vendors grows them.

My favorite stand at the Cedar Falls Farmer’s Market is Nita Young’s. I call her the herb lady, because she sells lots of fresh herbs and can tell you not only how to cook with them, but how to heal with them. In fact, Nita will consult with you on anything related to food and health. Just last week she gave me the lowdown on a variety of natural sugar substitutes, which I will blog about later this fall once I’ve had the chance to bake with several of them.

It was Nita, then, who introduced me to the Green Zebra tomato. One of the most gorgeous tomatoes out there, it’s green with dark green and yellow stripes (it kind of looks like green animal print; hence the name). It’s a smaller, firm tomato that’s tart yet sweet. It’s absolutely fabulous in salsas and relishes, although I tend to use heirloom tomatoes in my salsa anyway because I think the flavor is much better and makes the homemade salsa that much more unique. In the photo above, you see a mixture of heirloom, cherry, tomatillos and the Green Zebra tomatoes  used in this salsa. The Green Zebras are the ones that look like green apples.

To make this salsa, I improvised using a variety of veggies and other tomatoes from the Farmer’s Market and I left out the onion! I also used roasted peppers, using half of the peppers in this salsa and the other half in a chili soup I made the same night. This recipe doesn’t need lemon because the Green Zebras and tomatillos are so tart, but you might add a little lemon to preserve it … that is, IF you can keep any around for more than one night!

DSC02090Here are the basic ingredients and directions:

Ingredients:

1/2 roasted red pepper
1 roasted green chile
1 or 2 jalapenos (depending on how hot you like it)
1 clove garlic
1 tsp. cumin
2 tbsp. cilantro, chopped
5 red zebra tomatoes
4 small tomatillos
1 large heirloom tomato, peeled (whatever variety you can get your hands on)
1/2 tsp of kosher salt (add more salt to taste)

DSC02099Directions:

1. Put chile, peppers, garlic, salt and spices into a food processor and pulse until well minced.
2. Add cilantro and tomatoes and puree until blended but not liquefied.
3. You can serve this with any Mexican entree you’d like, though we eat it with red bean and rice chips and, as Chris is demonstrating, with a spoon!

Read Full Post »